Question for today – What Type of Paper Crafter are You? Are you a beginner, just starting to paper craft? Or a casual crafter who loves to add a little extra to your cards. Or are you like me, an avid crafter who adds lots of extra bling?
Never fear, I can show you how to take a beginner card then easily step it up to a fabulous card. I’ll start with my first card beginner level card. My second card shows how to step it up to for a casual stamper, that’s still quick to make. Finally, my third card shows how to easily add a few more details to make it an Avid crafter card. All the cards use scraps from our beautiful Designer Series patterned papers.
Many of us tend to hoard our Designer Series patterned papers because they are too pretty to use. But that’s the exact reason it should be used! We need to share those gorgeous papers to create joy for others. You can always buy more if you ever run out.
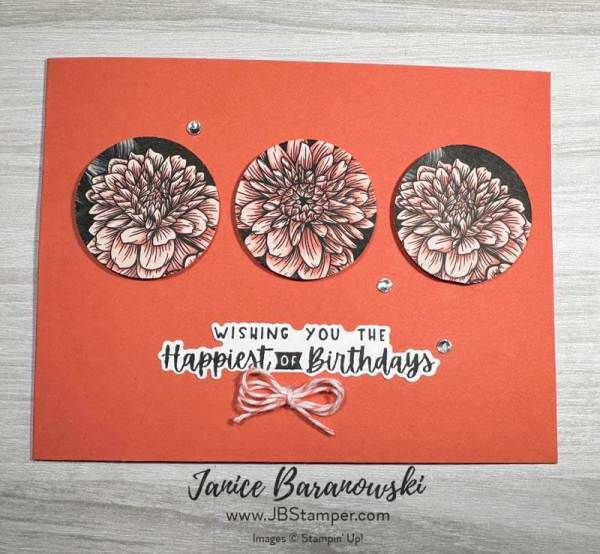
Beginner Crafter

To make my beginner’s card all you need is:
- Some pretty Designer Series Paper (DSP) or patterned paper (I used Favored Flowers)
- Half sheet of coordinating card stock for your card base (Calypso Coral)
- Greeting stamp (my Charming Sentiments photopolymer stamp set)
- Tuxedo Black Memento ink
- Your favorite adhesive
- Rhinestone Basic jewels
Punch out three 1-1/2″ circles from your Designer Series patterned paper. Adhere the circles to the front of your card. Stamp your greeting with Tuxedo Black Memento ink directly onto the card. Add several Rhinestone Basic Jewels, and admire your finished card. You can also punch squares, ovals, or elongated rectangle shapes instead of circles for a slightly different look.
Casual Crafter
For my casual card, I start with the same list of supplies, but add:
- Scrap of Basic White cardstock to stamp my greeting
- Same stamp set, but added the matching dies (Sentiment Silhouettes)
- Coordinating twine triple bow
- Stampin’ Dimensionals
Use the same directions as the Beginner card, but pop the circles up with dimensional to make them stand out on the card. I stamped the same greeting but on the Basic White card stock then die cut it with the coordinating Sentiment Silhouettes dies. Adhere the greeting onto the card base, and add a triple twine bow and the same Rhinestone Basic jewels. Still an easy card, but with a little more detail.
Avid Crafter

For my Avid card, I added more details including a textured layer. My supplies include:
- Same pretty Favored Flowers Designer Series Paper (DSP)
- Half sheet of Basic Black card stock for the card base, plus scraps large enough to punch or die cut three 1-3/8″ circles and for your greeting tag
- A 4 x 5-1/14″ piece of Calypso Coral card stock
- The same Charming Sentiments photopolymer greeting stamp set
- VersaMark ink
- White embossing powder
- Heat tool
- Countryside Blossoms embossing folder
- Your favorite adhesive
Start out punching the same flower circles, but add a larger Basic Black circle behind each flower circle. Dry emboss the Calypso Coral piece with the embossing folder. Use a Blending Brush to add Calypso Coral ink to the raised portions to make the embossing stand out. Adhere this to your card front, and add flower circles with dimensionals. Add a piece of looped twine to the middle flower. Stamp your greeting with VersaMark ink onto the Basic Black tag, sprinkle with White embossing powder and heat emboss it. Add this tag to the card front with dimensional.
You can see how to make a Beginner’s card into a Casual level or even an Avid level with just a few extra supplies. Now it’s your turn to try! What type of paper crafter are you? Let me know what you create with these directions!

Thanks for stopping by today. If you don’t have a demonstrator, I’d love to be yours. Just hop over to my site to shop. Hugs to all of you, and happy stamping!

Leave a Reply