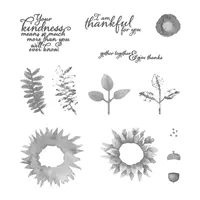
As I said yesterday, I was not entirely happy with how my Painted Harvest 2-step flowers were looking as I was playing with different color combinations. So I went to YouTube and found Patty Bennett’s tips (PattyStamps.com) on how to get a good Painted Harvest flower (don’t you just love the wonderful bloggers who share ideas through their videos??!! I’ve learn so much!). She suggested starting by stamping the center first – what? Who knew, not me. Next she suggested using your lightest color for the denser “background” layer of the flower (oops I used the darker color) and stamping it around the center – you can see exactly where to stamp it and you won’t end of with any “white” spaces between your center and the flower base (see my post yesterday to see what I mean)! Then with your darker color, stamp the more detailed layer over the area. And that’s where I stopped on yesterday’s cards. But she suggested going back to your background dense layer stamp, re-ink it with the lighter color, rotate it and stamp over the flower again. OMG!! I love how my second set of flowers for today turned out!! If you’ve had trouble with this stamp set, be sure go back and try this! I bet you’ll be amazed and very pleased!
I used Daffodil Delight as my light color and Pumpkin Pie as my darker color with the Early Espresso for the flower centers. My first card is a simple card that even beginners can do! I stamped the upper middle flower first, then stamped the lower right one, finishing up with the lower left one to get this layer look. Isn’t the details on the flowers just stunning – I was so excited, it worked beautifully!!! Thanks Patty for your tips and video!! I layered the Whisper White onto a Daffodil Delight and an Early Espresso frames to make it stand out on the Pumpkin Pie card base. I also used a retired Stampin’ Up! striped ribbon on the card.

I decided to do a stepped up version of the above card and added more layers, including a Petal Burst embossed layer for more details. This one has one of those amazing 10-second triple linen thread bows (again, thanks to Megan Daves with her 10-second bow maker!).

Again, to showcase the versatility of this stamp set for year round, I changed the colors and went with Spring/Summer colors of Old Olive, Whisper White, Daffodil Delight and Crushed Curry. Simple layers with the Petal Burst embossing for added detail and a tiny bow (so easy to make with that 10-second bow maker!) from some of my retired Stampin’ Up! ribbon.

Are you thinking that maybe this Painted Harvest stamp set should be on your order and in your craft room? Here’s what I used to make these cards:


And don’t forget the annual Buy 3 – get 1 Free Stampin’ Up! DSP sale through October 31!

Thanks for stopping by! Tomorrow I’ll show you how to transform the Painted Harvest flower into a Christmas wreath on a holiday card!
Wow Janice, your cards turned out just gorgeous!! I liked yesterday’s cards too, but the flowers definitely have more dimension on the cards today. Love all the layers too, such fun fall colors. Thanks for sharing 🙂
I should have researched the best way to stamp this set before I started, but glad I found the video tips. I really like how the definition on the flowers turned out – and – it was so easy and fast! Thanks Deepa